
In this 3rd part of the visualization series using Python programming language, we are going to introduce you to the Seaborn Library. Seaborn is a visualization library which is built on top of Matplotlib library in Python. This library helps us build method based plots which when combined with Matplotlib library methods lets us build flexible graphs.
In this tutorial we will be using tips data, which is a pre-defined dataset in the Seaborn library.
So let’s begin by importing the Seaborn library and giving it a sudo name sns. We will also be importing Matplotlib library to add more attributes to our graphs.
To load the tips data set we will be using .load_dataset() method.
![]()
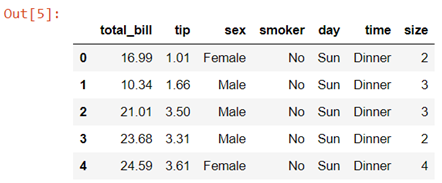
Data description:- This is a dataset of a restaurant which keeps a record of the amount of bill paid by a customer, tip amount over the total bill paid, gender of the customer, whether he or she was a smoker or not, the day on which they ate at the restaurant, what was the time when they ate at the restaurant and the size of the table they booked.
In case while loading the dataset you see a warning box appear on the screen you don’t need to worry , you haven’t done anything wrong. These FutureWarning boxes appear to make you aware that in the future there might be some changes in the library or methods you are using.

You can simply use the .simplefilter() method from the warning library to make them disappear.

Here the category argument helps you decide which type of warning you want to ignore.
Creating a bar plot in Seaborn
Now let’s quickly go ahead and create a bar plot with the help of .barplot() method.

In the above line of code we are using column named sex on the x axis and total_bill on the y axis. But this bar plot is very different from the bar plot which we usually make. The basic concept of a bar plot is to check the frequency but here we are also mentioning the y axis data which in general is not the case with a normal bar plot, that is, we get the frequency on the y axis when we are plotting a bar graph. So what does the above code do?
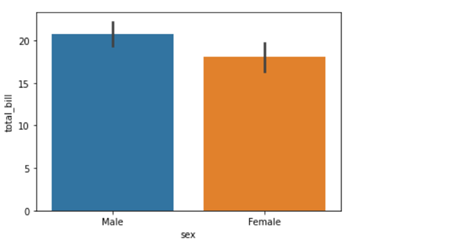
The above code compares the average of the category. In our case the above graph shows that the average bill of male is higher than the average bill of female. In case you want to plot a graph showing the average variation of bill around the mean (Standard deviation) you can use estimator argument within the .barplot() to do so.

Also if you want to change the background of your graph you can easily do so by using .set_style() method.

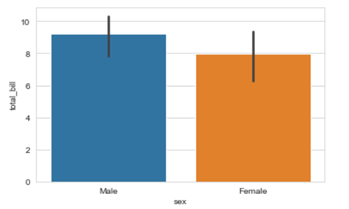

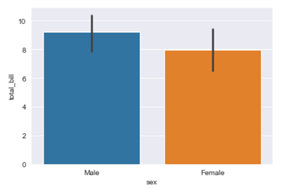
The vertical bars between the graph are called the error bars and they tell you how far from your mean or standard deviation by max data varies.
How to add Matplotlib attributes to your Seaborn graphs
Matplotlib methods can be imported and added to the Seaborn graphs to make them more presentable and flexible. Here we will be adding a title in our graph by using .title() method from the Matplotlib library.

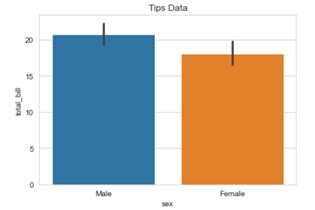
You can use other Matplotlib methods like .legend(),xlabel(),.ylabel() etc,. to add more value to your graphs.
The video tutorial attached below will further help you clarify your ideas regarding the Seaborn library. Follow the series to gain expertise in visualization with Python programming language. Keep on following the Dexlab Analytics blog for reading more informative posts on Python for data science training.
.
Python, python certification course, Python courses, python data science course, Python for data analysis, Python Training Institute