tableau certification delhi Archives - Page 3 of 4 - DexLab Analytics | Big Data Hadoop SAS R Analytics Predictive Modeling & Excel VBA

DIY Website Analytics Dashboards for Marketers at TC 17 – A Quick Overview [Video]

Are you bushed of creating reports in Excel? Do you feel annoyed every time you extract data from multiple platforms to develop website traffic reports?

 
DIY-Website-Analytics-Dashboards -for-Marketers-at-TC 17– A-Quick-Overview
 

Here we have some good news for y’all!


Two of Tableau’s own marketers have invented a next-level website analytics dashboard loaded with custom traffic metrics to turn reporting as easy as cake, and they are going to showcase it at TC17 in their breakout session Disparate measures: Tableau marketing’s DIY ethos and custom reporting.

Continue reading “DIY Website Analytics Dashboards for Marketers at TC 17 – A Quick Overview [Video]”

5 Quick-Fire Tips and Tricks from Dashboard Specialists

No two dashboards are similar. They cater to different audiences, serves distinct purposes, and address individual problems as unique as you.


5 Quick-Fire Tips and Tricks from Dashboard Specialists


In this blog post, we will talk about the 5 best practices to apply right now to create attractive dashboards, and engage users effectively.

Continue reading “5 Quick-Fire Tips and Tricks from Dashboard Specialists”

Text Adventure – Using Control Flow In Python

Python wascreated by Guido van Rossum and first released in 1991.Python, as a programming platform, has gained a huge popularity within a short span of time because of its flexibility and the user-friendly interface. The software can be deployed easily for developing statistical models and machine learning algorithms

 
Text Adventure- Using Control Flow In Python
 

In fact, due to the advent of AI and ML, Python has a language has had a certain kind of rebirth as far as industrial use is concerned. Today, however, the focus is going to be on a particular section of the language, namely the control flow to create a basic system in Python.

Continue reading “Text Adventure – Using Control Flow In Python”

The Alliance between MongoDB and Tableau Makes Visual Analysis Easier

The Alliance between MongoDB and Tableau Makes Visual Analysis Easier
 

After a volley of speculations, in 2015 the BIG revelation was made – MongoDB, the database for mammoth ideas has partnered with Tableau, the master in visual analytics to make visual analysis of rich JSON-like data structures easier directly in MongoDB. This is a fascinating telltale about a leader in modern databases for robust application development teaming with a leader in rapid-fire visual analytics to serve users’ better.


Recently, the two global tech players are again in the news – Tableau certified MongoDB’s connector for BI as a “named” connector, which means users for the first time can visually analyze rich JSON-like data structures incorporated with modern applications directly in MongoDB Enterprise Advanced. “Data is a modern software team’s greatest asset, so it needs to be easy for them to both store and visualize it in performant, flexible and scalable ways,” said Eliot Horowitz, CTO, MongoDB. He further added, “With Tableau’s certification of the MongoDB Connector for BI, executives, business analysts and data scientists can benefit from both the engineering and operational advantages of MongoDB, and the insights that Tableau’s powerful and intuitive BI platform make possible.”

Continue reading “The Alliance between MongoDB and Tableau Makes Visual Analysis Easier”

Maps in Tableau: Key to Answer Data Questions

Maps in Tableau: Key to Answer Data Questions

For creating brilliant data visualization, first you need to know which visual chart type would be ideal for the data story you want to tell. In this post, we will explore maps in Tableau, when and where they seem to be appropriate for particular data visualization, and how to make them more productive. If you want to use a map, make sure you know the reason why.

Maps help you attain, authenticate, or communicate spatial patterns with data. With these maps, you should start your presentation with a spatial question. This spatial question ensures that your map will perfectly find you an answer in the best way possible.


For example, answer this question using a data map:

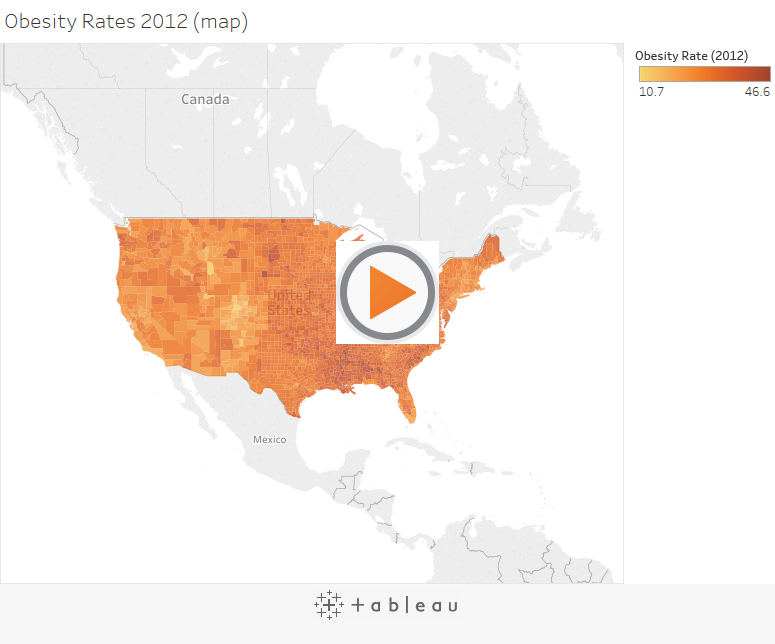
Which country in the US suffers from the highest obesity rate?

1_rss

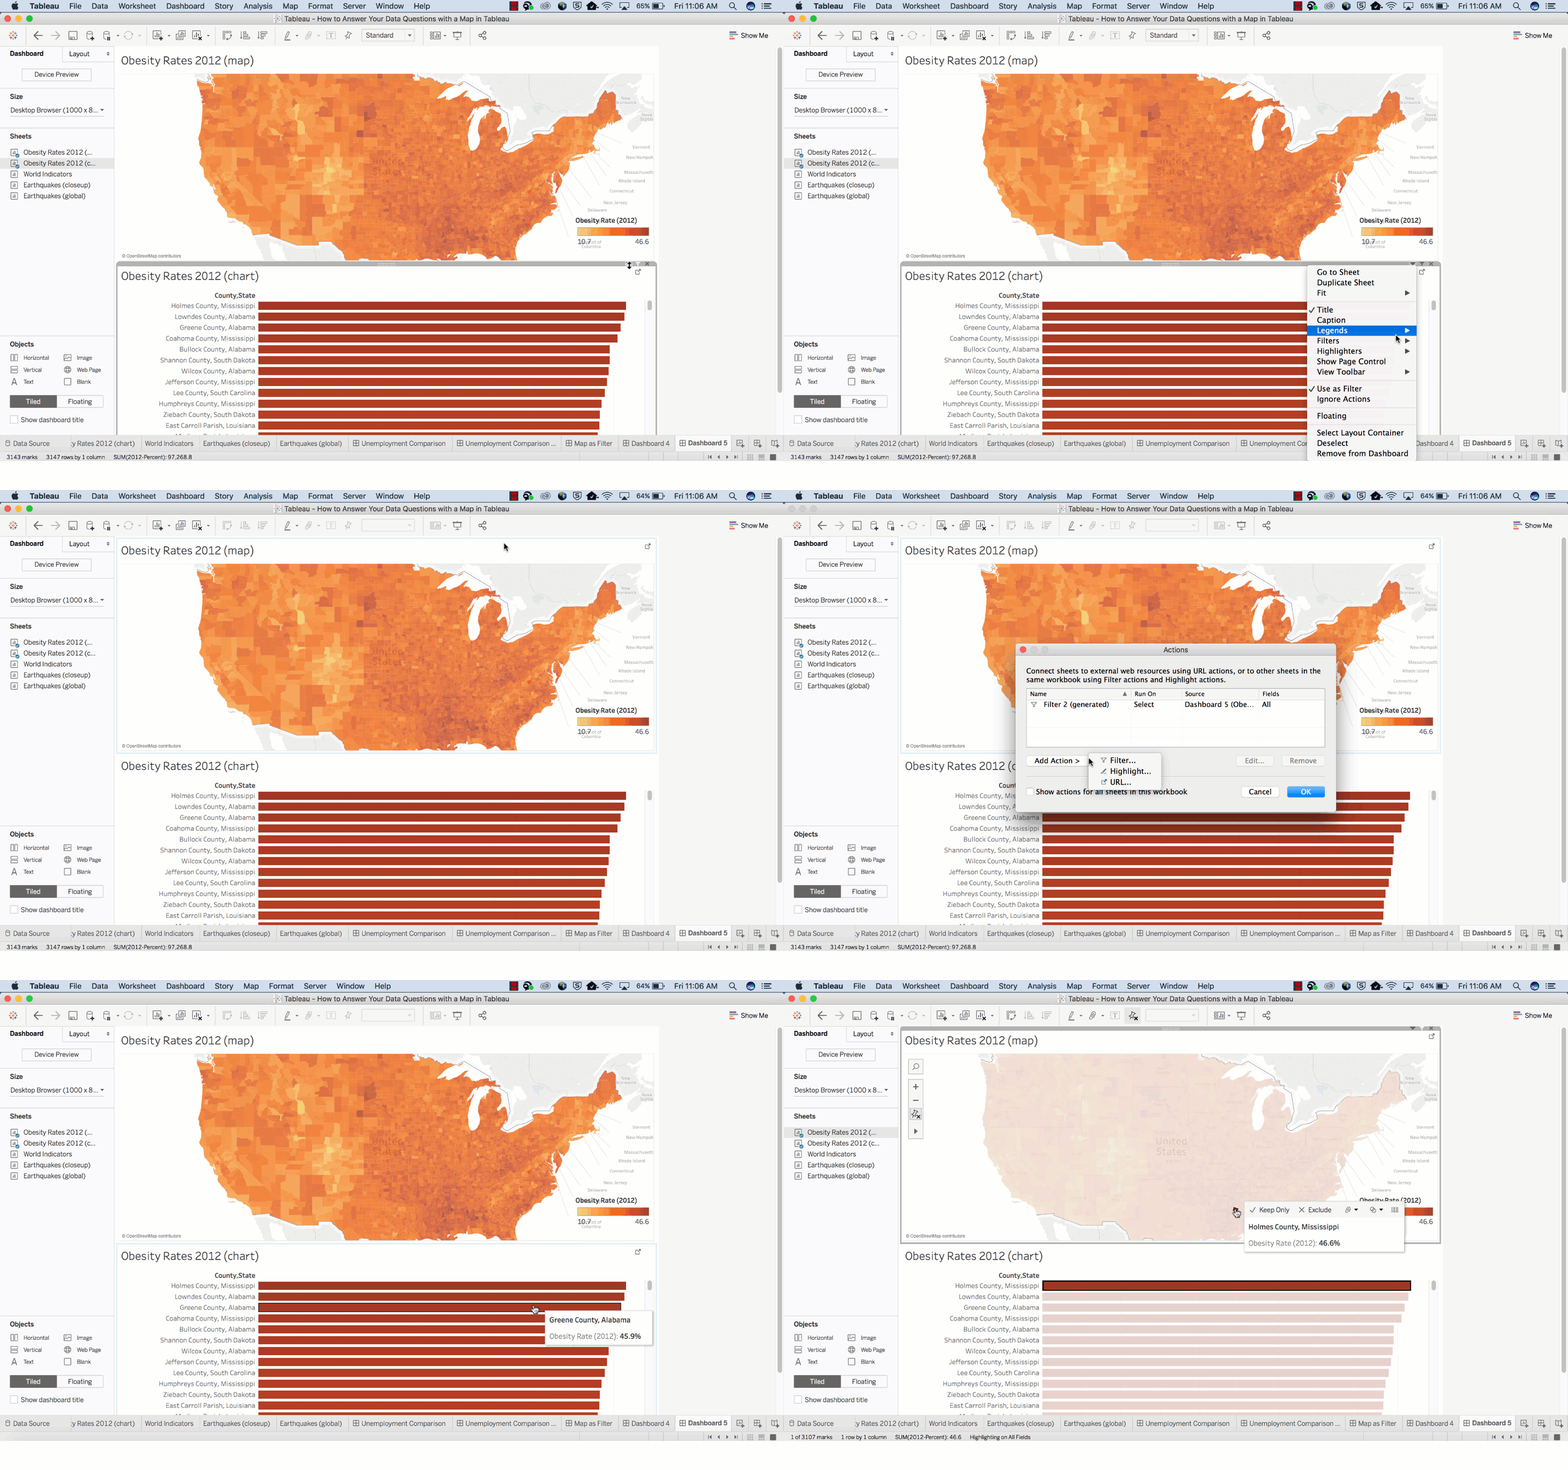
How much time did it take to answer that question? Did you quickly find the actual location without fuddling too much over the darker-colored country? I guess not. However, this map might not be the best path to answer this spatial question.

Now, let’s use the bar chart below to answer the same question.


It is easier to discover the answer here.

By combining the map and bar chart together, the answer to your spatial question can easily be derived.


Basically, maps are great for answering these two types of spatial questions:

  • What is the value for a specific location or mark on the map?
  • How do patterns compare between locations, regions, or attributes?


Go through the following tips to answer these questions better.

How to determine the value for a specific location or a mark on map?

Tooltips are the perfect way to move your mouse over a mark and observe a list of all the underlying dimensions and measures present.

You can easily edit a tooltip to include both dynamic and static text.

For example, identify which of these tooltips reveals a story about earthquakes in Japan.

screen_shot_2017-06-16_at_7.47.20_am

Also, the Tooltip improves speed-to-insight because the viewers of the map can easily find individual locations they want to find.

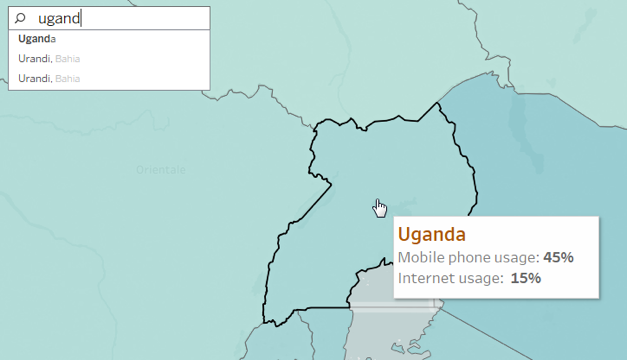
For example, find out the internet usage percentage in Uganda.

uganda

How do patterns compare between regions, locations or attributes?

To give answer to this question with a map, you must allow a direct comparison to be established between the data, symbols and even colors.

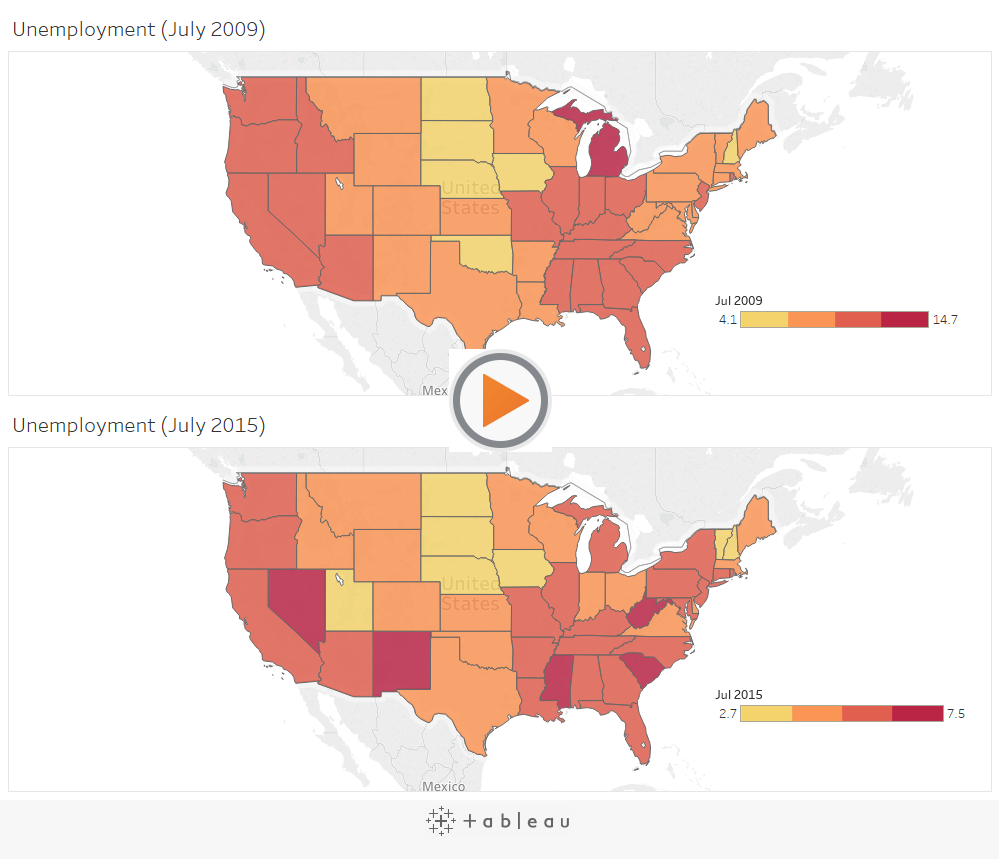
For example, while establishing a comparison between these two sets of unemployment data, the default color encoding doesn’t add any value for making direct comparisons. The reason being: the dark red doesn’t stand for the same value in both maps.

In turn, this situation can be very confusing for users who have no idea about the details of the data.

1_rss

The best way to deal with the problem is by getting an assurance that the color ramps in both maps use the same range.

Also, you can make your date easier for comparison by adjusting the color scheme, so that different color groups exude similar semantic meaning. Semantically-resonant colors help in processing information faster.

screen_shot_2017-06-16_at_7.52.23_am

In case, you want to learn more about Tableau, check out our blogs published on DexLab Analytics. We offer state-of-the-art Tableau training courses in Delhi, for any assistance reach out to us.


Interested in a career in Data Analyst?

To learn more about Data Analyst with Advanced excel course – Enrol Now.
To learn more about Data Analyst with R Course – Enrol Now.
To learn more about Big Data Course – Enrol Now.

To learn more about Machine Learning Using Python and Spark – Enrol Now.
To learn more about Data Analyst with SAS Course – Enrol Now.
To learn more about Data Analyst with Apache Spark Course – Enrol Now.
To learn more about Data Analyst with Market Risk Analytics and Modelling Course – Enrol Now.

Let’s Make Visualizations Better In Python with Matplotlib

Let’s Make Visualizations Better In Python with Matplotlib

Learn the basics of effective graphic designing and create pretty-looking plots, using matplotlib. In fact, not only matplotlib, I will try to give meaningful insights about R/ggplot2, Matlab, Excel, and any other graphing tool you use, that will help you grasp the concepts of graphic designing better.

Simplicity is the ultimate sophistication

To begin with, make sure you remember– less is more, when it is about plotting. Neophyte graphic designers sometimes think that by adding a visually appealing semi-related picture on the background of data visualization, they will make the presentation look better but eventually they are wrong. If not this, then they may also fall prey to less-influential graphic designing flaws, like using a little more of chartjunk.


Data always look better naked. Try to strip it down, instead of adorning it.

Have a look at the following GIF:

“Perfection is achieved not when there is nothing more to add, but when there is nothing left to take away.” – Antoine de Saint-Exupery explained it the best.

Color rules the world

The default color configuration of Matlab is quite awful. Matlab/matplotlib stalwarts may find the colors not that ugly, but it’s undeniable that Tableau’s default color configuration is way better than Matplotlib’s.

Get Tableau certification Pune today! DexLab Analytics offers Tableau BI training courses to the aspiring candidates.

Make use of established default color schemes from leading software that is famous for offering gorgeous plots. Tableau is here with its incredible set of color schemes, right from grayscale and colored to colorblind friendly.

A plenty of graphic designers forget paying heed to the issue of color blindness, which encompasses over 5% of the graphic viewers. For example, if a person suffers from red-green color blindness, it will be completely indecipherable for him to understand the difference between the two categories depicted by red and green plots. So, how will he work then?


For them, it is better to rely upon colorblind friendly color configurations, like Tableau’s “Color Blind 10”.


To run the codes, you need to install the following Python libraries:


  1. Matplotlib
  2. Pandas


Now that we are done with the fundamentals, let’s get started with the coding.
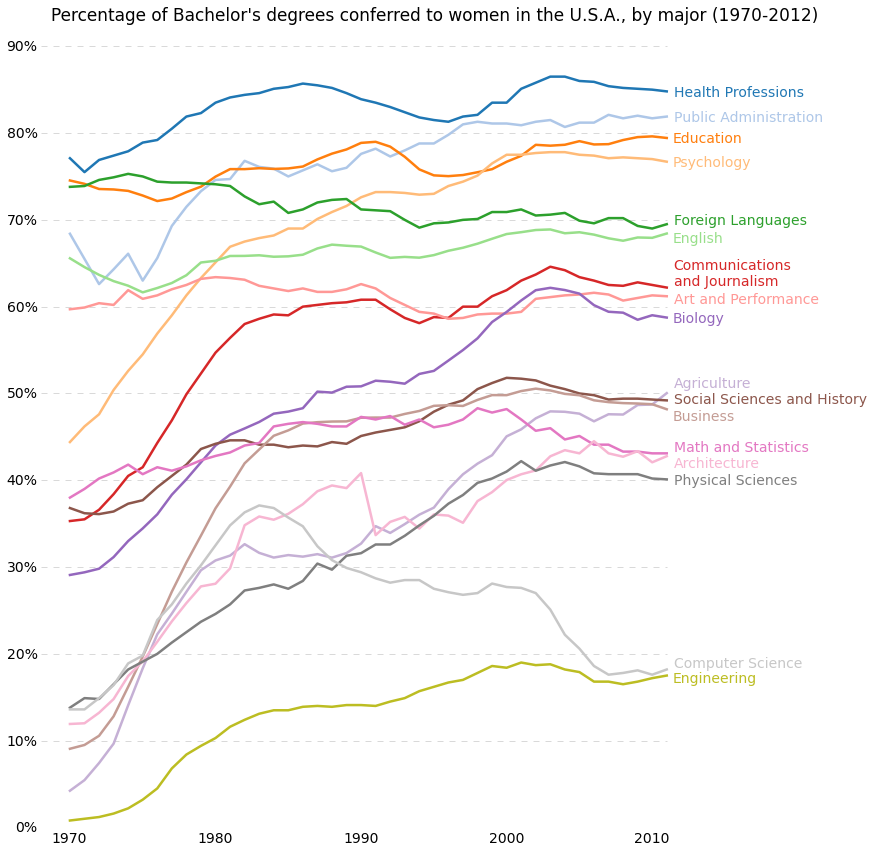
 

percent-bachelors-degrees-women-usa


import matplotlib.pyplot as plt
import pandas as pd

# Read the data into a pandas DataFrame.  
gender_degree_data = pd.read_csv("http://www.randalolson.com/wp-content/uploads/percent-bachelors-degrees-women-usa.csv")  

# These are the "Tableau 20" colors as RGB.  
tableau20 = [(31, 119, 180), (174, 199, 232), (255, 127, 14), (255, 187, 120),  
             (44, 160, 44), (152, 223, 138), (214, 39, 40), (255, 152, 150),  
             (148, 103, 189), (197, 176, 213), (140, 86, 75), (196, 156, 148),  
             (227, 119, 194), (247, 182, 210), (127, 127, 127), (199, 199, 199),  
             (188, 189, 34), (219, 219, 141), (23, 190, 207), (158, 218, 229)]  

# Scale the RGB values to the [0, 1] range, which is the format matplotlib accepts.  
for i in range(len(tableau20)):  
    r, g, b = tableau20[i]  
    tableau20[i] = (r / 255., g / 255., b / 255.)  

# You typically want your plot to be ~1.33x wider than tall. This plot is a rare  
# exception because of the number of lines being plotted on it.  
# Common sizes: (10, 7.5) and (12, 9)  
plt.figure(figsize=(12, 14))  

# Remove the plot frame lines. They are unnecessary chartjunk.  
ax = plt.subplot(111)  
ax.spines["top"].set_visible(False)  
ax.spines["bottom"].set_visible(False)  
ax.spines["right"].set_visible(False)  
ax.spines["left"].set_visible(False)  

# Ensure that the axis ticks only show up on the bottom and left of the plot.  
# Ticks on the right and top of the plot are generally unnecessary chartjunk.  
ax.get_xaxis().tick_bottom()  
ax.get_yaxis().tick_left()  

# Limit the range of the plot to only where the data is.  
# Avoid unnecessary whitespace.  
plt.ylim(0, 90)  
plt.xlim(1968, 2014)  

# Make sure your axis ticks are large enough to be easily read.  
# You don't want your viewers squinting to read your plot.  
plt.yticks(range(0, 91, 10), [str(x) + "%" for x in range(0, 91, 10)], fontsize=14)  
plt.xticks(fontsize=14)  

# Provide tick lines across the plot to help your viewers trace along  
# the axis ticks. Make sure that the lines are light and small so they  
# don't obscure the primary data lines.  
for y in range(10, 91, 10):  
    plt.plot(range(1968, 2012), [y] * len(range(1968, 2012)), "--", lw=0.5, color="black", alpha=0.3)  

# Remove the tick marks; they are unnecessary with the tick lines we just plotted.  
plt.tick_params(axis="both", which="both", bottom="off", top="off",  
                labelbottom="on", left="off", right="off", labelleft="on")  

# Now that the plot is prepared, it's time to actually plot the data!  
# Note that I plotted the majors in order of the highest % in the final year.  
majors = ['Health Professions', 'Public Administration', 'Education', 'Psychology',  
          'Foreign Languages', 'English', 'Communications\nand Journalism',  
          'Art and Performance', 'Biology', 'Agriculture',  
          'Social Sciences and History', 'Business', 'Math and Statistics',  
          'Architecture', 'Physical Sciences', 'Computer Science',  
          'Engineering']  

for rank, column in enumerate(majors):  
    # Plot each line separately with its own color, using the Tableau 20  
    # color set in order.  
    plt.plot(gender_degree_data.Year.values,  
            gender_degree_data[column.replace("\n", " ")].values,  
            lw=2.5, color=tableau20[rank])  

    # Add a text label to the right end of every line. Most of the code below  
    # is adding specific offsets y position because some labels overlapped.  
    y_pos = gender_degree_data[column.replace("\n", " ")].values[-1] - 0.5  
    if column == "Foreign Languages":  
        y_pos += 0.5  
    elif column == "English":  
        y_pos -= 0.5  
    elif column == "Communications\nand Journalism":  
        y_pos += 0.75  
    elif column == "Art and Performance":  
        y_pos -= 0.25  
    elif column == "Agriculture":  
        y_pos += 1.25  
    elif column == "Social Sciences and History":  
        y_pos += 0.25  
    elif column == "Business":  
        y_pos -= 0.75  
    elif column == "Math and Statistics":  
        y_pos += 0.75  
    elif column == "Architecture":  
        y_pos -= 0.75  
    elif column == "Computer Science":  
        y_pos += 0.75  
    elif column == "Engineering":  
        y_pos -= 0.25  

    # Again, make sure that all labels are large enough to be easily read  
    # by the viewer.  
    plt.text(2011.5, y_pos, column, fontsize=14, color=tableau20[rank])  

# matplotlib's title() call centers the title on the plot, but not the graph,  
# so I used the text() call to customize where the title goes.  

# Make the title big enough so it spans the entire plot, but don't make it  
# so big that it requires two lines to show.  

# Note that if the title is descriptive enough, it is unnecessary to include  
# axis labels; they are self-evident, in this plot's case.  
plt.text(1995, 93, "Percentage of Bachelor's degrees conferred to women in the U.S.A."  
       ", by major (1970-2012)", fontsize=17, ha="center")  

# Always include your data source(s) and copyright notice! And for your  
# data sources, tell your viewers exactly where the data came from,  
# preferably with a direct link to the data. Just telling your viewers  
# that you used data from the "U.S. Census Bureau" is completely useless:  
# the U.S. Census Bureau provides all kinds of data, so how are your  
# viewers supposed to know which data set you used?  
plt.text(1966, -8, "Data source: nces.ed.gov/programs/digest/2013menu_tables.asp"  
       "\nAuthor: Randy Olson (randalolson.com / @randal_olson)"  
       "\nNote: Some majors are missing because the historical data "  
       "is not available for them", fontsize=10)  

# Finally, save the figure as a PNG.  
# You can also save it as a PDF, JPEG, etc.  
# Just change the file extension in this call.  
# bbox_inches="tight" removes all the extra whitespace on the edges of your plot.  
plt.savefig("percent-bachelors-degrees-women-usa.png", bbox_inches="tight")
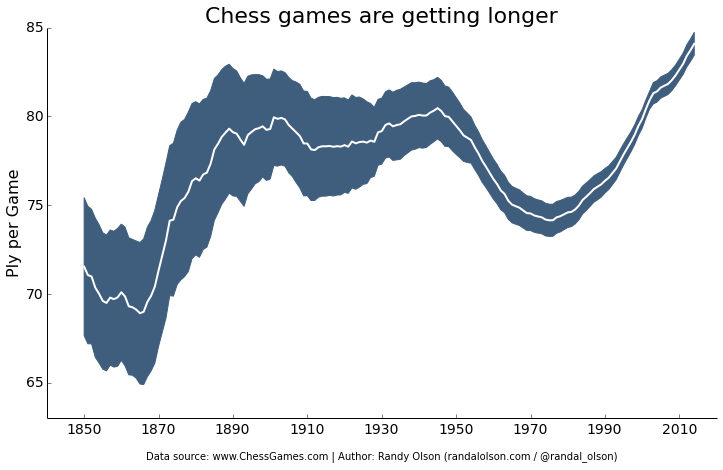
 

chess-number-ply-over-time
 

import pandas as pd
import matplotlib.pyplot as plt
from scipy.stats import sem

# This function takes an array of numbers and smoothes them out.
# Smoothing is useful for making plots a little easier to read.
def sliding_mean(data_array, window=5):
    data_array = array(data_array)
    new_list = []
    for i in range(len(data_array)):
        indices = range(max(i - window + 1, 0),
                        min(i + window + 1, len(data_array)))
        avg = 0
        for j in indices:
            avg += data_array[j]
        avg /= float(len(indices))
        new_list.append(avg)
        
    return array(new_list)

# Due to an agreement with the ChessGames.com admin, I cannot make the data
# for this plot publicly available. This function reads in and parses the
# chess data set into a tabulated pandas DataFrame.
chess_data = read_chess_data()

# These variables are where we put the years (x-axis), means (y-axis), and error bar values.
# We could just as easily replace the means with medians,
# and standard errors (SEMs) with standard deviations (STDs).
years = chess_data.groupby("Year").PlyCount.mean().keys()
mean_PlyCount = sliding_mean(chess_data.groupby("Year").PlyCount.mean().values,
                             window=10)
sem_PlyCount = sliding_mean(chess_data.groupby("Year").PlyCount.apply(sem).mul(1.96).values,
                            window=10)

# You typically want your plot to be ~1.33x wider than tall.
# Common sizes: (10, 7.5) and (12, 9)
plt.figure(figsize=(12, 9))

# Remove the plot frame lines. They are unnecessary chartjunk.
ax = plt.subplot(111)
ax.spines["top"].set_visible(False)
ax.spines["right"].set_visible(False)

# Ensure that the axis ticks only show up on the bottom and left of the plot.
# Ticks on the right and top of the plot are generally unnecessary chartjunk.
ax.get_xaxis().tick_bottom()
ax.get_yaxis().tick_left()

# Limit the range of the plot to only where the data is.
# Avoid unnecessary whitespace.
plt.ylim(63, 85)

# Make sure your axis ticks are large enough to be easily read.
# You don't want your viewers squinting to read your plot.
plt.xticks(range(1850, 2011, 20), fontsize=14)
plt.yticks(range(65, 86, 5), fontsize=14)

# Along the same vein, make sure your axis labels are large
# enough to be easily read as well. Make them slightly larger
# than your axis tick labels so they stand out.
plt.ylabel("Ply per Game", fontsize=16)

# Use matplotlib's fill_between() call to create error bars.
# Use the dark blue "#3F5D7D" as a nice fill color.
plt.fill_between(years, mean_PlyCount - sem_PlyCount,
                 mean_PlyCount + sem_PlyCount, color="#3F5D7D")

# Plot the means as a white line in between the error bars. 
# White stands out best against the dark blue.
plt.plot(years, mean_PlyCount, color="white", lw=2)

# Make the title big enough so it spans the entire plot, but don't make it
# so big that it requires two lines to show.
plt.title("Chess games are getting longer", fontsize=22)

# Always include your data source(s) and copyright notice! And for your
# data sources, tell your viewers exactly where the data came from,
# preferably with a direct link to the data. Just telling your viewers
# that you used data from the "U.S. Census Bureau" is completely useless:
# the U.S. Census Bureau provides all kinds of data, so how are your
# viewers supposed to know which data set you used?
plt.xlabel("\nData source: www.ChessGames.com | "
           "Author: Randy Olson (randalolson.com / @randal_olson)", fontsize=10)

# Finally, save the figure as a PNG.
# You can also save it as a PDF, JPEG, etc.
# Just change the file extension in this call.
# bbox_inches="tight" removes all the extra whitespace on the edges of your plot.
plt.savefig("chess-number-ply-over-time.png", bbox_inches="tight");

Histograms
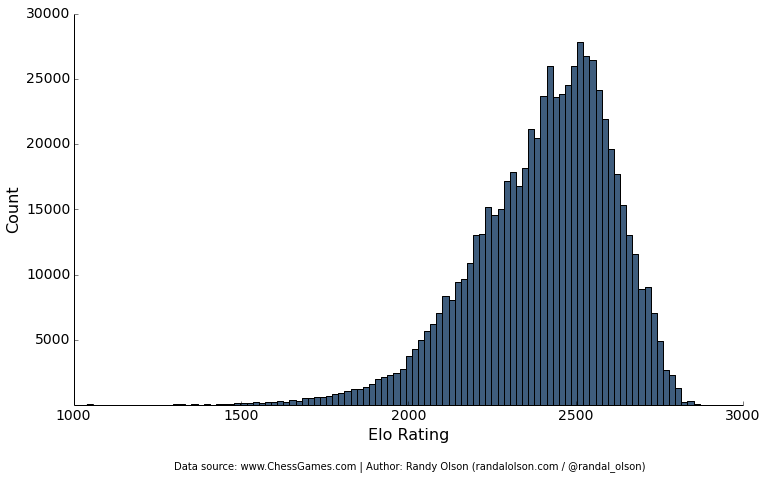
 
chess-elo-rating-distribution


import pandas as pd
import matplotlib.pyplot as plt

# Due to an agreement with the ChessGames.com admin, I cannot make the data
# for this plot publicly available. This function reads in and parses the
# chess data set into a tabulated pandas DataFrame.
chess_data = read_chess_data()

# You typically want your plot to be ~1.33x wider than tall.
# Common sizes: (10, 7.5) and (12, 9)
plt.figure(figsize=(12, 9))

# Remove the plot frame lines. They are unnecessary chartjunk.
ax = plt.subplot(111)
ax.spines["top"].set_visible(False)
ax.spines["right"].set_visible(False)

# Ensure that the axis ticks only show up on the bottom and left of the plot.
# Ticks on the right and top of the plot are generally unnecessary chartjunk.
ax.get_xaxis().tick_bottom()
ax.get_yaxis().tick_left()

# Make sure your axis ticks are large enough to be easily read.
# You don't want your viewers squinting to read your plot.
plt.xticks(fontsize=14)
plt.yticks(range(5000, 30001, 5000), fontsize=14)

# Along the same vein, make sure your axis labels are large
# enough to be easily read as well. Make them slightly larger
# than your axis tick labels so they stand out.
plt.xlabel("Elo Rating", fontsize=16)
plt.ylabel("Count", fontsize=16)

# Plot the histogram. Note that all I'm passing here is a list of numbers.
# matplotlib automatically counts and bins the frequencies for us.
# "#3F5D7D" is the nice dark blue color.
# Make sure the data is sorted into enough bins so you can see the distribution.
plt.hist(list(chess_data.WhiteElo.values) + list(chess_data.BlackElo.values),
         color="#3F5D7D", bins=100)

# Always include your data source(s) and copyright notice! And for your
# data sources, tell your viewers exactly where the data came from,
# preferably with a direct link to the data. Just telling your viewers
# that you used data from the "U.S. Census Bureau" is completely useless:
# the U.S. Census Bureau provides all kinds of data, so how are your
# viewers supposed to know which data set you used?
plt.text(1300, -5000, "Data source: www.ChessGames.com | "
         "Author: Randy Olson (randalolson.com / @randal_olson)", fontsize=10)

# Finally, save the figure as a PNG.
# You can also save it as a PDF, JPEG, etc.
# Just change the file extension in this call.
# bbox_inches="tight" removes all the extra whitespace on the edges of your plot.
plt.savefig("chess-elo-rating-distribution.png", bbox_inches="tight");

Here Goes the Bonus

It takes one more line of code to transform your matplotlib into a phenomenal interactive.


Learn more such tutorials only at DexLab Analytics. We make data visualizations easier by providing excellent Python courses in India. In just few months, you will cover advanced topics and more, which will help you make a career in data analytics.


Interested in a career in Data Analyst?

To learn more about Machine Learning Using Python and Spark – click here.
To learn more about Data Analyst with Advanced excel course – click here.
To learn more about Data Analyst with SAS Course – click here.
To learn more about Data Analyst with R Course – click here.
To learn more about Big Data Course – click here.

Making Data Visualizations Smarter, Tableau Explains How

Making Data Visualizations Smarter, Tableau explains How

Appalling, bewildering and utterly nonsensical – data at times can look incomprehensible, especially in its raw forms. This accelerated the foundation of the data visualization company and our very own ‘business dashboard’ tool. Generally found locked within the so-called BI sphere, we can now consider these top notch graphical tools as a powerful medium of assimilating, categorizing, analyzing and then presenting data in a highly interactive and interesting form, using images and charts.

2

What images are used in a BI dashboard?

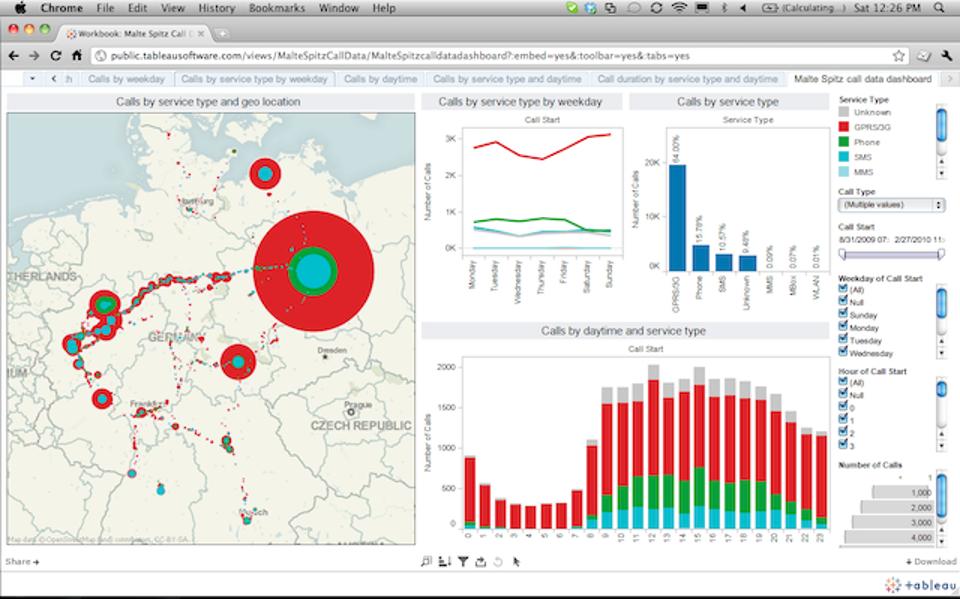
Typically, we would found scatter plots, bubble charts, heat maps, pie charts, geographical maps and of course standard tables strewn across a BI dashboard– in short, it is a real smorgasbord of visualization tools.

But a question that clogs our minds is – why do we have to use these tools? What purpose they serve? The most prominent underlying reason typically revolves around the fact that we rely more on the computing power to sail through the numbers and then feature those numbers or ‘trends’ that the human mind would have taken ages to comprehend.

From our standpoint, we humans are more comfortable with pictures than tables or numbers. Spotting a trend through visual representation makes things easier and faster as compared to their traditional counterparts.

Infusing some more intelligence

Tableau Software, a Data Visualization specialist is in its endeavour to add intelligence in its existing format by injecting new brain power in the Tableau 10.3 product release. 

Expect the following updates:

  1. Automated table and join recommendations, powered by machine learning algorithms
  2. Data driven alerts for proactive monitoring of key metrics
  3. Six new data sources are added for rapid-fire analysis

To make things easier, Tableau excels to help create data dashboard table construction USING machine learning tools – and, trust me it would be quite important as all the machine logs comes mostly from the Internet of Things (IoT).

The mechanism behind data alerts

Powered by latest data-driven alerts, users can now receive instant notifications just the moment their data crosses a pre-determined threshold, ensuring they never miss out the changes occurring within the organisation.

Francois Ajenstat, chief product officer at Tableau stated, “Tableau 10.3 makes it easy for teams to access data, wherever it resides. In all, customers can now connect to more than 75 data sources via 66 connectors, without any programming. That includes a new PDF connector, which allows people to directly import PDF tables into Tableau with just one click. With an Adobe estimated 2.5 trillion PDFs worldwide, this unlocks a new realm of data that can be leveraged for rich analysis.”

New improved Tableau is now equipped with new connectors to data sources, like ServiceNow, MongoDB, Amazon Athena, Dropbox and Microsoft OneDrive.

Is data visualization really a cure-all?

If you ask me, I would say NO, not necessarily. Just by adopting data visualization and BI tools, such as Penataho, SAP, Microsoft, TIBCO and others, it doesn’t mean everything will be good to go. Keep in mind, though the algorithms are gaining momentum and becoming super powerful, we humans are still better in identifying the nuances, quirks, outliers and absolutely unique one-offs.

As parting thoughts, Tableau is marvellous, but don’t forget your fundamental commands in mathematics, learnt at school. They’ll help you, for sure! Till then, wish you luck!

1648519ca6ff87be75a3618dce6b4497d

For Tableau training courses, rest your trust on DexLab Analytics. We are a reputable Tableau Training Institute, headquartered in Gurgaon, with a branch in Delhi.


Interested in a career in Data Analyst?

To learn more about Data Analyst with Advanced excel course – Enrol Now.
To learn more about Data Analyst with R Course – Enrol Now.
To learn more about Big Data Course – Enrol Now.

To learn more about Machine Learning Using Python and Spark – Enrol Now.
To learn more about Data Analyst with SAS Course – Enrol Now.
To learn more about Data Analyst with Apache Spark Course – Enrol Now.
To learn more about Data Analyst with Market Risk Analytics and Modelling Course – Enrol Now.

What Makes Tableau 10 So Desirable Among the IT Nerds

What Makes Tableau 10 So Desirable Among the IT Nerds

Your data just got better, say thanks to Tableau 10. The big data geeks have worked on both the beauty and brains of Tableau, to make the analyses easier, faster and exceptionally delightful. Tableau 10 features an exciting new look and feel, loaded with cute fonts and beautiful colours to make your viz sparkle.

We are thrilled. We have been waiting for days to gauge how some of the Tableau 10 new features will synchronise with our conventional business interface for Hadoop. We have culled out some of the best features of Tableau 10, which had made us zealous and left us buzzing. And here they are ..

An extremely visually appealing new interface

Connect the little dots to get a bigger picture. The new interface pays enough attention to minute details making the entire visualization environment pleasant and engaging.

For example: When you name a worksheet tab, the same name pops up as an inline title, blending seamlessly with the viz – now isn’t that great!

atscale1

Ten on ten to Tableau’s clustering feature

Owing to Tableau’s outstanding analytics capabilities, Tableau 10’s clustering feature is the next best thing. The feature focuses on the elements of a pool of data values and visually highlights an inconspicuous number of clusters, which is found in the data. This makes it easier for an analyst to run his eyes through the data sets they need to investigate.

Spotting the zip codes was never so easy before, come and take a look at the following video.

Tableau 10’s highlighting feature helps in finding a needle from the big data haystack

While developing interesting data visualizations, we often need to present the most comprehensive view of the data, so that the consumers get the right information they are looking for, without foraging here and there. With Tableau 10’s highlighting feature, this goal is easily achieved.

In the video shared below, we can see the weekly trend of sales and numbers of customer across the states included in the sales transaction data.

Multisource data integration and blending

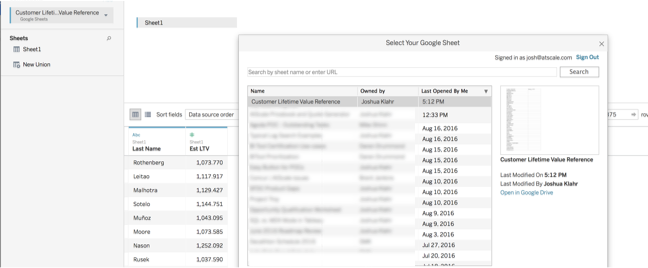
By using Tableau 10, the users will be able to directly connect to data stored in Google Sheets.

Scroll down:

atscale2 (1)

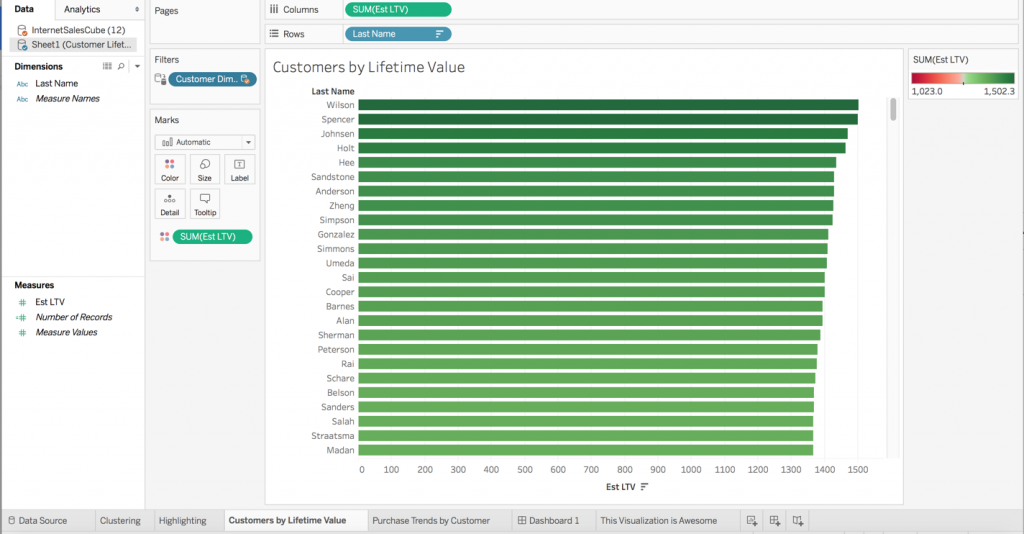
Develop visual representation of the most-favoured customers, based on estimated lifetime value.

005

Once the new data source is created, you can now use the data-relationships feature to let Tableau know that the Last Name column from the Google Sheets data set is mapped to the Customer Dimension column from my AtScale big data virtual cube.

004

Soon after the above relation has been accomplished, a filter is initiated on my Purchase Trends by Ranked Customers dashboard. Watch the video, to get a clearer picture.

These are some of the slivers of what’s new in Tableau 10. Want even more? Join DexLab Analytics for intensive Tableau Certification Training. This premier data science training institute excels in data analytics certification courses. Get interesting data knowledge and Tableau insights from the veterans!


Sources: tableau.com
 

Interested in a career in Data Analyst?

To learn more about Data Analyst with Advanced excel course – Enrol Now.
To learn more about Data Analyst with R Course – Enrol Now.
To learn more about Big Data Course – Enrol Now.

To learn more about Machine Learning Using Python and Spark – Enrol Now.
To learn more about Data Analyst with SAS Course – Enrol Now.
To learn more about Data Analyst with Apache Spark Course – Enrol Now.
To learn more about Data Analyst with Market Risk Analytics and Modelling Course – Enrol Now.

Power BI or Tableau? Which is Better and Why?

Power-BI-or-Tableau--Which-is-Better--and-Why

In the present data frenzy setting, data visualization is the new Talk of the Town. Various companies are developing and launching their own data visualization tools in the market. For quite some time now, Tableau has been the pioneering data visualization platform and till date the best to consider. Tableau’s data visualization tool is unbeatable to any other emerging product in the digital community. 

Apparently, Tableau has a remarkable competitor, recently. It is the Power BI, a decisive and dynamic BI tool, brought into by Microsoft. It is catching the trend with Tableau fast and appears to be on its way to become the number one BI tool in the digital market.

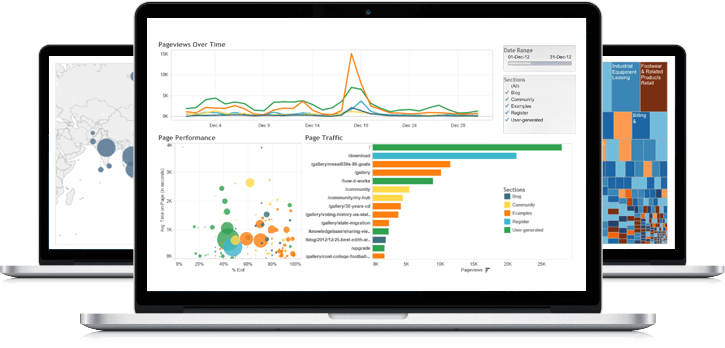
tableau_dashboard

Talking about features, there is little room to establish a set of comparisons between Power BI and Tableau, as Power BI is better equipped with scintillating features. Putting it aside, Tableau comes with its own respective advantages, like high-end visualizations and superb scalability.

Is data visualization your business’ prime focus? If yes, Tableau will be the perfect solution for your venture. However, if you are on a look out for a platform, excelling on versatile analytic capabilities, including predictive modelling, optimizing and reporting, Power BI suite will be the real deal-breaker.  

In terms of tools and abilities, Power BI and Tableau boasts of two major differences:

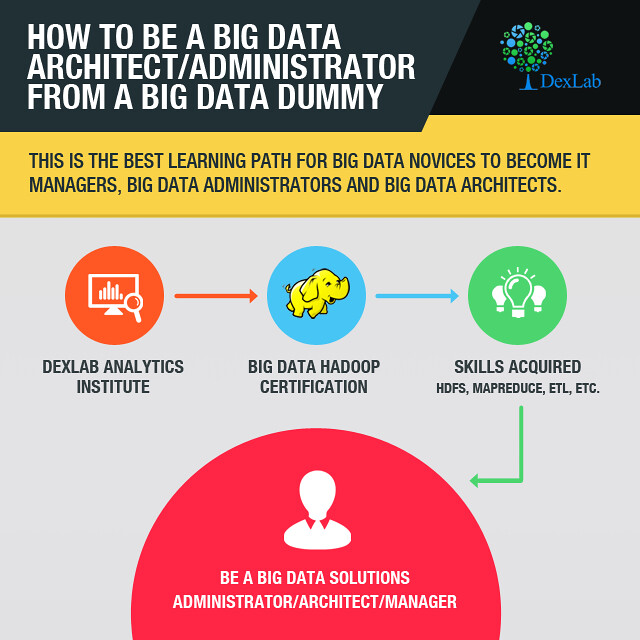
Dummies guide to being a Data Architect / Administrator

Visualizations

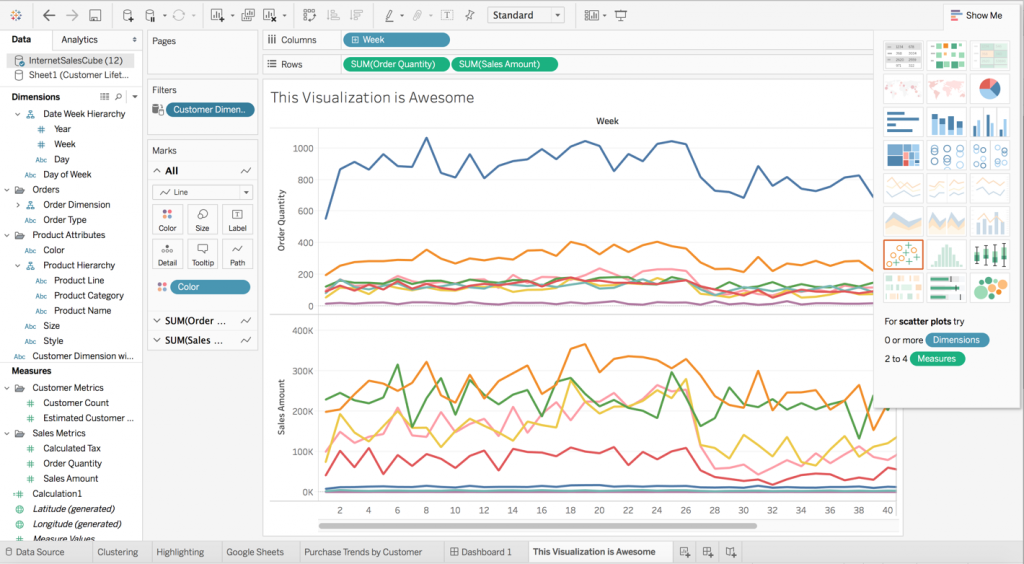
Data visualization is crucial. Tableau strongly emphasizes on visuals, while Power BI mostly stresses on dynamic data manipulation features along with providing access to basic visualizations. Under Power BI, users select the visualization first and then drag the data into it. It is easy to upload data sets. On the other hand, Tableau offers sophisticated visualizations for larger data sets as compared to Power BI. Here, users can select the data and switch between visualizations on the go. Hoping between visualizations is easier in Tableau.


5

In-depth analysis

Analysis of data by each solution is distinctive in its own ways. Where Tableau lays stress on the front end, Power BI works more on the back-end depth. Better analyses of data is possible with Power BI than it was with Excel. The meat and potatoes of Power BI is to provide faster analyses of standard data sets. In case of Tableau, the features highlighted here ensure users ways to answer questions while they delve deeper into investigating data visualizations. The strategy displays basic trends as forecasts, implement ‘what if’ questions to calibrate data hypothetically and visualize ingredients of data dynamically for better comparison and contrast.

When it comes to investigating familiar sets of data and Excel is no more efficacious, Power BI is highly recommended. Contrarily, for interactive superior visualizations, Tableau remains unparalleled. However, it fails to casts its charm in manipulating data, where its tailing counterpart Power BI proves its superiority.

2016-09-23-1474621255-9641969-bibusinessintelligencets100646689primary.idge_

Drawing an inference – Tableau is my personal favourite and is still the most productive BI Tool available in the market. However, from a business perspective, Power BI is continuously on its endeavour to elevate its quality and is at present one of the most appealing products in the data viz world.  

For a bright career in data analytics, enrol for intensive tableau training courses. DexLab Analytics is a top-notch data science online learning platform. Run your eyes through their tableau BI training courses today.


Interested in a career in Data Analyst?

To learn more about Data Analyst with Advanced excel course – Enrol Now.
To learn more about Data Analyst with R Course – Enrol Now.
To learn more about Big Data Course – Enrol Now.

To learn more about Machine Learning Using Python and Spark – Enrol Now.
To learn more about Data Analyst with SAS Course – Enrol Now.
To learn more about Data Analyst with Apache Spark Course – Enrol Now.
To learn more about Data Analyst with Market Risk Analytics and Modelling Course – Enrol Now.

Call us to know more