Scikit-learn 0.22 Archives - DexLab Analytics | Big Data Hadoop SAS R Analytics Predictive Modeling & Excel VBA

Gradient Boosting In scikit-learn 0.22 For Handling Missing Values

Gradient Boosting In scikit-learn 0.22 For Handling Missing Values

A new tutorial session regarding the scikit-learn 0.22 is here and our sole focus is going to be updating your knowledge regarding the new features that have been added to this library. For this particular session we have decided to introduce you to the concept of gradient boosting that can handle the missing values. This concept is being introduced to clear out a previous misconception regarding the functioning of gradient boosting for this particular purpose.

The earlier notion surrounding GBM or, the gradient boosting algorithm in scikit-learn, was that it was unable to handle the missing values. In this tutorial we want to clarify that misconception, because, contrary to the notion XGBoost library or, XGB library is perfectly capable of handling the missing value analysis.  It has been found that XGB library performs better than the normal method taken to find the missing values.

Now getting back to the scikit-learn 0.22 way of solving the issue of missing values. There has been an enhancement in the algorithm gradient boosting due to which you no longer have to handle the missing values because it will handle it of itself.

So take a look at how the concept of native support for missing values for gradient boosting works.

The ensemble algorithm, ensemble.HistGradientBoostingClassifier and ensemble.HistGradientBoostingRegressor, both classification regression now have the power of native support for missing values or, (NaNs). This is indicative of the fact that there is no need now for imputing data during training or predicting.

To gain an insight into how you perform this you need to follow the complete code sheet that you can find here


Now, as you go through the code you will find the word enable, which might surprise you and make you question why it says enable here? Well, this is because it is still being developed.

So, basically all of the algorithms in the scikit-learn 0.22 that are under development process have to run an extra line of code that goes like enable_hist_gradient_boosting. After further development there won’t be any need of that.

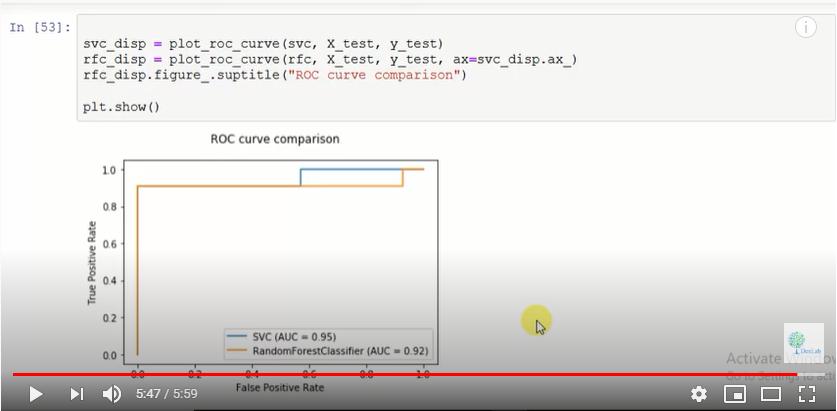
The video attached below will further explain how the algorithm works.

There will be more informative tutorial sessions like this, so to stay updated keep following the DexLab Analytics blog.

Watch the video here.


.

KNN Imputer – Release Highlights for Scikit-learn 0.22

KNN Imputer – Release Highlights for Scikit-learn 0.22

Today we are going to learn about the new feature of Scikit-learn version 0.22 called KNN Imputation. This feature now enables us to support imputation for completing missing values using k-Nearest Neighbours (KNN). To track our tutorials on other new releases from scikit-learn, read our blog here and here.

Introduction

Each sample’s missing values are imputed using the mean value from nearest neighbours found in the training set. Two samples are close if the features that are neither missing are close. By default, a Euclidean distance metric that supports missing values, nan_euclidean_distances, is used to find the nearest neighbours.

Input and Output

So, what we do first is to import libraries like NumPy and run them. Then we create as many rows as we wish to. Then we run the function KNN Imputer and we can decide how many neighbours we want. We first, as is the procedure to use scikit-learn goes, create an object and then run it. Then we can directly put the input values in imputer.fit_transform and get the output values in the form of patterns detected in the input values.

The code sheet for this tutorial is provided in a Github repository here


For more on this do watch the video attached herewith. This tutorial was brought to you by DexLab Analytics. DexLab Analytics is a premiere Machine Learning institute in Gurgaon.

Watch the video here.


.

ROC-AUC-for-Multi-Class-Classification-Release Highlights for Scikit-learn 0.22

ROC-AUC-for-Multi-Class-Classification-Release Highlights for Scikit-learn 0.22

Today we are going to learn about the new releases from Scikit-learn version 0.22, a machine learning library in Python. We, through this video tutorial, aim to learn about the much talked about new release wherein ROC-AUC curve supports Multi Class Classification. Prior to this version, Scikit-learn did not have a function to plot the ROC curve.

To access our previous tutorial on the plotting of the ROC curve, click here.

The ROC-AUC score function can also be used in multi-class classification. Two averaging strategies are currently supported: the one-vs-one (OvO) algorithm computes the average of the pairwise ROC AUC scores and the one-vs-rest (OvR) algorithm computes the average of the ROC AUC scores for each class against all other classes.

In both cases, the multiclass ROC AUC scores are computed from probability estimates that a sample belongs to a particular class according to the model. The OvO and OvR algorithms support weighting uniformly (average=’macro’) and weighting by prevalence (average=’weighted’).

To begin with, we import multi classification, SVC and roc_auc_score. Then we specify the number of classes we want in the multi-classification function. Then we apply the SVC function and finally the roc_auc_score one. This function will give us the probable prediction for all the classes and we will then choose the one that has the highest probability. When we run it we get a ROC_AUC score of 0.99.

The code sheet is provided in a Github repository here.


For more on this do watch the video attached herewith. This tutorial was brought to you by DexLab Analytics. DexLab Analytics is a premiere Machine Learning institute in Gurgaon.

Watch the video here.


.

ROC-Curve-New-Plotting-API-Release Highlights for Scikit-learn 0.22

ROC-Curve-New-Plotting-API-Release Highlights for Scikit-learn 0.22

Today we are going to learn about the new releases from Scikit-learn version 0.22, a machine learning library in Python. We, through this video tutorial, aim to learn about the much talked about new release called Plotting API. Prior to this version, Scikit-learn did not have a function to plot the ROC curve.

A new plotting API is available for creating visualizations. The new API allows for quickly adjusting the visuals of a plot without involving any recomputation. It is also possible to add different plots to the same figure. In this tutorial we are going to study the plotting of the ROC curve.

The code sheet is provided in a Github repository here.


We will attempt to plot the ROC curve on two different algorithms and compare which one is a better function. First we choose to make a classification data. Then we go on to plot the ROC curve using SVC classifier and then further plot the curve using a random forest classifier.

Fig. 1

Fig. 1

For more on this do watch the video attached herewith. This tutorial was brought to you by DexLab Analytics. DexLab Analytics is a premiere Machine Learning institute in Gurgaon.


.

Stacking Regressor – Latest Releases of Scikit-Learn 0.22

Stacking Regressor - Latest Releases of Scikit-Learn 0.22

Today we are going to learn about the new releases from Scikit-learn version 0.22, a machine learning library in Python. First we learn how to install it on our systems. Then, we come to the much talked about new release called stacking regression.

Now, how does stacking regression work? Well, you have been using machine learning algorithms like Decision Tree or Random Forest. Have you heard of Voter Classifier? It is an algorithm in Scikit-learn. Ensemble algorithm is a combination of two or more algorithms to make it stronger.

When working on a set of data, we must apply all these algorithms to get predicted values. Then we vote out classified predicted values in Voter Classifier. Stacking Classifier is different. What we are doing in it is stacking together the predicted values to make a new input.

Initially, we make prediction by using various algorithms separately. Their results or output are then concatenated together. Then we use this output as a new input and apply the algorithms to it to get target variable. This method is known as stacking regression.

We try this out on a data set that can be taken from a github repository the link to which is given below.


Then we use two algorithms as estimators. Then we use stacking regression to build a model. For more on this do watch the video attached herewith. This tutorial was brought to you by DexLab Analytics. DexLab Analytics is a premiere Machine Learning institute in Gurgaon.


.

Call us to know more